Tuesday 30 October 2012

Candy Corn Cookies

I am gearing up for Halloween, and my Halloween themed baking starts off with some Candy Corn Cookies.

For these, I have used my basic Sugar Cookie recipe. I also added a squirt of honey to try and replicate the flavour of candy corn.

Ensure that you use gel or paste food colouring, and not the liquid, otherwise your dough will be too wet. Be generous with the colouring as it will fade a little when cooked.

I meant to add sanding sugar before I baked them, but in my haste, I forgot.

Ingredients:

  • 375g plain flour
  • 1 teaspoon baking powder
  • 250g unsalted butter, room temperature
  • 225g sugar
  • 1 large free-range egg
  • 1 teaspoon good quality vanilla extract
  • yellow food colouring gel
  • orange food colouring gel
Method:
  1. Cream together the butter and sugar until light, pale and fluffy
  2. Mix the vanilla essence into the egg & add to the butter mixture a little at a time (throw in a handful of the flour to stop the egg and butter separating).
  3. Sift together the flour and the baking powder then add into to the mixture
  4. Separate the dough into 3 equal portions.
  5. Colour one portion yellow, and a second portion orange (you can use red plus yellow if you don't have orange).
  6. Line a 2lb loaf tin with cling film. 
  7. Press the plain uncoloured portion of dough into a flat layer
  8. Slightly dampen the surface with a little water on your fingers to make it tacky, then press the orange dough into a flat layer.
  9. Repeat with the yellow layer.
  10. Wrap the dough in cling film and refrigerate in the tin for at least 4 hours
  11. Preheat the oven to 350°F  / 176°C / Gas Mark 4
  12. Unwrap the dough and cut a slice about 1cm thick along the length. Lay the slice flat on a lightly floured surface and make zig zag cuts to form triangle cookies. Some will have a white tip, some will have a yellow tip, but that's okay.
  13. Place on a lined baking tray and bake for 8-10 minutes until the edges are just starting to colour.
  14. Leave on the tray for a few minutes before transferring to a cooling rack to fully cool.

Wednesday 10 October 2012

Turkey and Pancetta Pie

I had a few ingredients I needed to use up, and so decided to make a Turkey and Pancetta pie. You can always use chicken instead of turkey, or bacon instead of pancetta for this. The rest of the ingredients are all standard store cupboard stuff, apart from maybe the mascarpone - which is one of the ingredients I wanted to use up.

A simple light shortcrust pastry, and you are well on your way to a tasty supper.


Ingredients:
  • 30g butter
  • 3 Turkey escalopes (or chicken breasts) diced (approx 420g)
  • 130g pancetta cubes ( or diced bacon)
  • 1 red onion, diced
  • 1 tbsp plain flour
  • 250ml chicken stock
  • 100ml semi-skimmed milk
  • 2 dessert spoon mascarpone (optional)
  • 2 tsp fresh chopped tarragon ( or 1 tsp dried)
  • Enough short crust pastry for a base and lid
Method:
  1. Melt butter and add a dash of olive oil
  2. Add the pancetta and let it simmer for a minute or two to allow the fat to render
  3. Add the turkey breast and stir until browned
  4. Take out the turkey and pancetta with a slotted spoon and put aside
  5. Add in the diced onion and simmer for a few minutes until softened
  6. Add in the crushed garlic and stir through
  7. Sprinkle over 2 level tablespoons of plain flour
  8. Stir through and allow the flour to cook out for a minute or two
  9. Slowly add the stock a bit at a time, stirring well to remove any lumps
  10. Then add the milk
  11. Now add in the mascarpone if using (you can switch this for a bit of cream if you want)
  12. Add in the tarragon
  13. Finally add in the turkey and pancetta then allow to cool slightly while you prepare the pastry
  14. Roll out the pastry and line the greased tart tin. Trim off any excess leaving it a little proud of the edges to allow for a little shrinkage
  15. Prick the pastry bottom, then cover with greaseproof and fill with baking beans
  16. Bake at gas mark 4 for 10 minutes
  17. Take out the beans, brush with some beaten egg, and put back in oven for 5 minutes to seal the base
  18. Place the filling into the base, and cover with more rolled out pastry. Seal the edges, and brush with more beaten egg. Place a couple of slits to allow steam to escape
  19. Bake in the oven at gas mark 5 for 30 minutes. Check after 20 mins as you may need to put a circle of greaseproof paper around the edges to prevent burning.
  20. Eat immediately with some lovely green veg & creamy mash, or chill once cooled and eat cold - it is just as nice.
  21.  
TIP:
Once cooled, it can be frozen. Reheat only once it is fully defrosted. Try freezing it in portion sizes - that way you don't have to defrost the whole pie!

Servings8
Calories per serving 582

Chocolate Explosion birthday cake

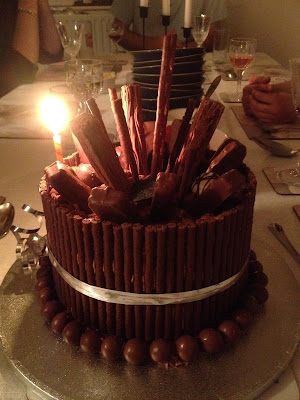
Some time ago, I saw an image of a birthday cake (I can't remember where now sadly) and I have been longing for an excuse to re-create it in my own style. The cake basically was decorated with chocolate bars, but in a way that it looked like they were exploding from the cake.

A friend of mine was attending a dinner party I was going to and as it was also her birthday, I brought along this cake as a surprise!

It was a rich chocolate Victoria sponge in three layers, sandwiched and topped with buttercream. Then, surrounded with Matchmakers ( but you could use chocolate scrolls or cigarellos for this), surrounded by a ring of Maltesers, and topped with an explosion of chocolate bars.


Ingredients:

Cake
  • 340g plain flour
  • 30g cocoa powder
  • 340g caster sugar
  • 340g butter
  • 6 free-range eggs
  • 2 tsp vanilla extract
  • a dash of milk
  • 2 boxes of Nestle's Matchmakers (I used orange flavoured) or chocolate cigarellos
  • 1 large packet of Maltesers
  • A selection of chocolate bars including a Curly Wurly, Twix, Flake, Milky Way and a handful of Thornton's Continental.
Buttercream
  • 200g butter
  • 400g icing sugar
  • 30g cocoa powder
  • 1 tsp vanilla extract
  • dash of milk
Method: 
  • Pre-heat the oven to Gas mark 4/350°F/176°C
  • Cream together the sugar and butter until light and fluffy
  • Beat the eggs with the vanilla extract and add to the butter/sugar a little at a time, ensuring it is fully incorporated between each addition.
  • Sift the cocoa powder with the flour then carefully fold in
  • If the mixture seems a little stiff, add a dash of milk.
  • Distribute the mixture between 3 7" cake tins that have been greased and lined.
  • Bake in the centre of the oven for 20-25 minutes until an inserted skewer comes out clean
  • Allow to cool fully before attempting to decorate.
  • As your cakes cool, make the butter-cream by mixing the butter with the icing sugar
  • Add a dash of milk until the required consistency is achieved.
  • Sandwich the cakes with a thin layer of the vanilla buttercream.
  • Add the cocoa powder to the remaining buttercream.  Put a quarter of the remaining mixture in a piping bag, or bottle.
  • Cover the top and sides of the cake in chocolate buttercream.
  • The stick Matchmakers, or cigarellos all around the outside of the cake.
  • Using the reserved buttercream, pipe little stars around the bottom and press in a ring of Maltesers.
  • Do the same around the inside of the Matchmakers on top of the cake.
  • Starting with the longest chocolate bar, the Curly Wurly, place this into the centre of the cake.
  • Working with progressively shorter bars, work your way to the outside, then finally scatter with Thorntons continental
  • Crumble a Flake into the gaps
  • Finally, tie a ribbon around the centre to prevent any of your Matchmakers from falling off.
Present your cake with some indoor sparklers or candles


Servings16
Calories per serving 840 


Apologies!

Apologies to anyone wondering what has happened to posts on this blog.

I have still been baking, and gardening, but for some reason these never quite made it onto the blog. I aim to try and catch up with some of the things I have recently made - including a rather spectacular chocolate cake!